Convert Copy Protected WMA files to MP3,
WAV, or Vorbis with this free tutorial.
Convert copy protected WMA to MP3, WAV, or Vorbis files with this tutorial. Copy protected WMA files contain encrypted data and can only be played if you have permission or a license to do so.
This tutorial will not show you how to crack, break, unprotect, or remove the encryption on these CopyProtected files if you do not already have a valid license for the file.
You must have a valid license to burn the copy protected WMA files to AudioCD to apply this tutorial. This tutorial is intended to allow you "fair use" of these files on portable players which only support MP3 files like an In-dash Car MP3 player or a iPod / iPhone or to make a backup copy of the audio file. This MP3 file is not copy protected.
Please be sure to check out our Frequently Asked Questions (FAQs) at the
bottom of this tutorial.
Copy Protected WMA files are usually downloaded from services like Napster 2.0, BuyMusic.com, MSN Music, or MusicMatch and are encrypted with Microsoft's Digital Rights Management (DRM) techniques. No known software exists which will allow non-licensed users the ability to break this DRM technology. While this WMA to MP3 tutorial is lengthy; the end result is having a copy which can be played with standard MP3 players, iPods, or iPhones. We have looked all over the internet; and as far as we know; none of the WMA decoder software will operate on copy protected WMA files; this is why we created this tutorial. If you know differently; please let us know.
While this tutorial is specific to copy protected WMA files; it can be used to convert standard, non-copy protected WMA files as well.
| Please note: This entire tutorial and the associated images is Copyright 2004-2008 by Zittware.com. ALL RIGHTS RESERVED. You may not copy or distribute this tutorial without prior WRITTEN permission from Zittware.com. Linking to this page is permitted and encouraged; but do not plagiarize this tutorial. |
To apply this tutorial you will need the following:
- Windows Media Player, MusicMatch JukeBox, or Roxio AudioCentral.
- A CD Burner.
- A CD recordable disk. CDRW disks are recommended to avoid waste.
- CDMaster32 v5.7.0.0 or better.
At a high level you perform the following steps to convert copy protected WMA files to other file formats:
- Using CDMaster32, save WMA file tags (Artist / Album / Songname / ect) for use later in the ripping process.
- With a supported application; you create an AudioCD from the copy protected WMA files using your CD Burner and a CDRW disk.
- Using CDMaster32, rip the newly created AudioCD to high quality MP3 files.
- [optional] Use MB Tagger to identify and tag the MP3 files.
Now, let's get to the detailed, step-by-step tutorial on how to unprotect and convert WMA files:
- We assume you already have Windows Media Player v9 (or v10) installed on your computer. If not; please download it from here and install it.
- Make sure you have installed CDMaster32 v5.7 (or better). If not; please download it from here and install it.
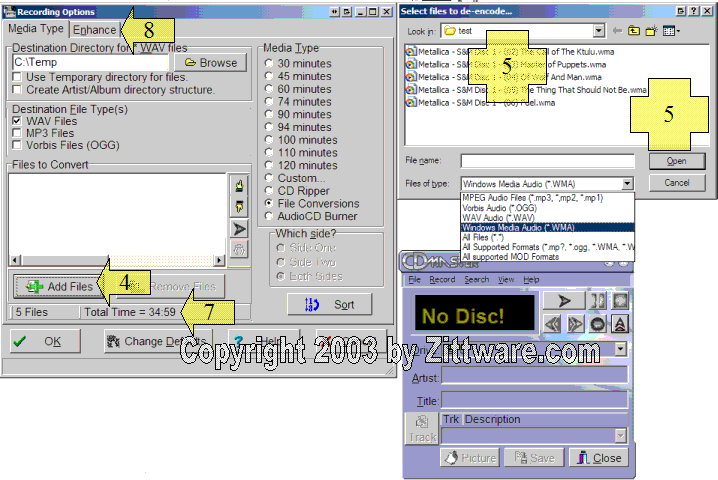
- Open CDMaster32, select the Record / File
Conversions / to WAV menu option.

- On the resulting Recording Options screen, select the Add Files
button.

- Browse for the Windows Media Audio (*.WMA) files you wish to convert. Select the files and click the Open button.
- Repeat steps 4 and 5 as many times as necessary to get the files you may want on the CD.
- Make sure you do not exceed the maximum time limit for CD-R (CD-RW) media you may be using. (Usually 74 or 80minutes).
- Click the Enhance Tab.

- Turn off the Normalize check box. The Normalize function will occur later when ripping from the AudioCD.
- Same for Sound Enhancement. Turn off the Enable Sound Enhancement DSP check box.
- Click the OK button.
- On the WMA screen; browse the file rights list to identify any problem
files. If files with insufficient rights were detected; they will be
identified with a red X. MusicMatch files will be identified with yellow !!
marks so make sure you select either MusicMatch Jukebox or Roxio
AudioCentral to burn these files as Windows Media player cannot burn
MusicMatch files to AudioCD.
If files with insufficient rights were detected; they will not be burned to AudioCD. Hit Cancel to select different files.
HELP: My Napster files are comming up with Insufficient rights!
HELP: My MusicMatch files are comming up with yellow explaination marks.

- Select a detected WMA to AudioCD application.
- Click the OK button.
- Read support warning for detailed information and click the I understand button.
- Click the OK button which prompts you about the soon to arrive popup menu.
- Select the Copy to CD or Device menu option.
- Windows Media Player should launch and provide you with a CD Burner
screen:

- If you haven't already done so; insert the recordable CD media into your CD Burner. Zittware recommends that you use 80minute CD ReWritable media for this step so that you can erase it later and reuse it.
- Select the AudioCD as the device you wish to burn to.
- Check each of the copy protected tracks you wish to burn onto the AudioCDs.
- Do not change the order, remove, or add files to this screen. Doing so will prevent CDMaster32 from detecting the new CD and transferring song data.
- Press the Copy button or press <ALT_C> when Media Player is active. HELP: I got an error at this step.
- Media player will begin converting the WMA file and burning it to AudioCD:

- Wait for Media Player to finish burning the AudioCD. Once this is complete, the CD Burner drive tray usually opens. Go ahead and close the drive with the freshly created audioCD still in the drive.
- Click the OK button which prompts you about the soon to arrive popup menu.
- Select the Add to Burn List menu option.
- Windows Media Player should launch and provide you with a screen. Click
the Burn tab.

- If you haven't already done so; insert the recordable CD media into your CD Burner. Zittware recommends that you use 80minute CD ReWritable media for this step so that you can erase it later and reuse it.
- Select the AudioCD as the device you wish to burn to.

- Check each of the copy protected tracks you wish to burn onto the AudioCDs.
- Do not change the order, remove, or add files to this screen. Doing so will prevent CDMaster32 from detecting the new CD and transferring song data.
- Press the Start Burn button. HELP: I got an error at this step.
- Media player will begin converting the WMA file and burning it to AudioCD:

- Wait for Media Player to finish burning the AudioCD. Once this is complete, the CD Burner drive tray usually opens. Go ahead and close the drive with the freshly created audioCD still in the drive.
- Next, MusicMatch's Burner screen should appear.

- Click the AudioCD icon.
- Then click the Burn button.
- Let MusicMatch burn the cd as normal.
- When the CD is completed; simply close the burner screen by clicking the close button.
- If the CD burner drive tray opened, close the drive with the freshly created audioCD still in the drive. and wait for the drive's lights to stop blinking.
- Next, Roxio's AudioCentral screen should appear.

- Click the stop button to stop the cd from playing.
- Select all the tracks using your mouse. Click the first track (top), hold down the Shift key, and click the last track.
- Click the burn disc icon.
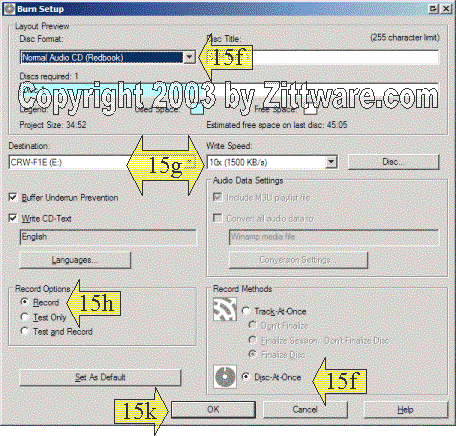
- The Burn Setup screen should appear.

- Select "Normal Audio CD (Redbook)" in the disc format dropdown box.
- Verify your CD Burner settings and Write speed.
- Set the Record Options to "Record". (If this is the first time you have used Roxio AudioCentral; it is recommended that you use the Test and Record function to verify it functions correctly with your hardware).
- Set your recording methods. Disc-At-Once is usually preferred as it prevents gaps between songs.
- Click the OK button; which should start the process of burning the
AudioCD.

- Wait for the CD to finish burning.
- Then click the OK button to close the progress screen.
- Close the AudioCentral screen.
- If the CD burner drive tray opened, close the drive with the freshly created audioCD still in the drive. and wait for the drive's lights to stop blinking.
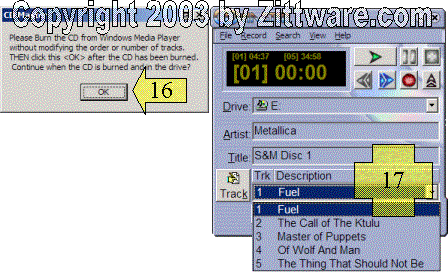
- After reinserting the newly created AudioCD; wait for the drive light to
stop blinking and click the OK button on the CD has been burned
prompt.

- At this point; CDMaster32 will scan your CD drives looking for the new CD.
Once it finds the new CD; it will associate the song information stored
automatically for you in step #13 above. CDMaster32 will then display the
track information on it's main screen.
Hint: IF CDMaster32 does not display the track information; eject the cd and reload it. - Now we are going to apply CDMaster32's CD Ripping tutorial. The rest of this tutorial assumes you want to convert to MP3. Other formats are supported including WAV and Vorbis... but is not covered in this tutorial.
- Open the CD Ripper screen (aka Recording
Options
window) by clicking the RECORD menu and clicking CD Ripper
followed by CD to MP3.

- At this point, the Recording Options screen will appear. Ensure that
MP3 is checked in the Destination File Type(s) box.

- Select available CD tracks you want to rip in the Available Tracks box.
- The use the Left arrow to move the selected tracks to the Tracks to
Process box.
Hint: You can drag and drop tracks between the boxes.
Hint: If you want to rip the entire CD, you can use the "move all" left arrow: - Click on the MP3 Encoder tab.

- If you want the to-be-created MP3 files in a certain directory, you can change the Destination Directory for *.MP3 files box on the MP3 Encoder tab. Remember this directory! You may want to write it down now.
- Next set your MP3 encoding preferences. For Napster.com WMA files; Zittware recommends MP3 VBR with a minimum bitrate of 96kbit/s and a maximum bitrate of 192kbit/s. Ideally you want to pick "archive quality" (320kbits) MP3 files here to prevent loss of audio quality for later conversions to other formats; but Napster.com files are usually ~160kbits so the archive quality setting is just wasted space.
- Click the Enhance tab.

- Do you want to Normalize the files to the same volume? Verify your desired settings in the Normalize check box.
- Same for Sound Enhancement. Verify your desired settings in the Enable Sound Enhancement DSP check box.
- Now we are ready to rip the selected tracks to MP3. Simply click the OK
button...
and the CD Ripper will begin to rip the audio to WAV. HELP: I got an error at this step. - After one track has been ripped the built-in encoders will automatically begin encoding your WAV file to the MP3 file format.
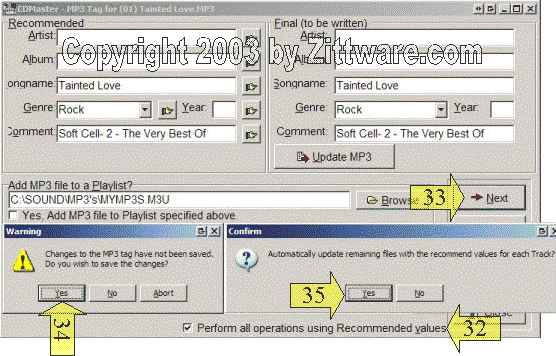
- Once all the tracks have been ripped and encoded to MP3; CDMaster32 will prompt you to enter the MP3 TAG
information which is derived from the CD's Data which was stored in step #13 above.

- Enable the Perform all operations using Recommended values check box.
- Click the Next button.
- The Next button will prompt you to save the changes of the current file. Click the Yes button.
- You will then be prompted to Confirm you want the remaining files to be updated. Click the Yes button.
- The Tagging screen will save the track data to the MP3 files and return you to the main CDMaster32 screen.
- If you haven't already done so, download and install MusicBrainz MB Tagger.
- Open MB Tagger and using the open button; select newly created MP3 files.

- MB Tagger will contact it's server with the sound properties of the MP3 file in an attempt to identify the song. If MBTagger identifies the song; it will appear in the Identified tab.
- Any songs that MBTagger could not identify will appear in the Unidentified
tab. Your job is to search for the songs using their browser.

- Verify all the tracks have been identified by MB Tagger:

- Now, Save the new tag information downloaded from MusicBrainz servers by clicking the Save icon.
- then submit the TRM ids to the MusicBrainz servers so others can benefit from database you just created.
- Now you have successfully converted all the WMA files to a MP3 file...
complete with tag information.

- From here; you can convert the files to MP3, Vorbis, or Normalized AudioCD by following CDMaster32's tutorials.
(scroll down for step 16)
(scroll down for step 16)
(scroll down for step 16)
The remaining part of this tutorial is optional and is not required to enjoy full use of your new MP3s created from Copy Protected WMA files.
Did you know CDMaster32 can take MP3 files and burn them onto an AudioCD . See our tutorial on MP3 to AudioCD conversion.
CDMaster32 has a lot of other features... check out our growing Tutorials section.
By following these steps and you can convert any copy protected WMA file to MP3.
Frequently Asked Questions
Q. Copy protection. I understand that your [tutorial] takes care of that by allowing me to convert to mp3. QUESTION: Will I be able to use the mp3 files, created by your software, ANYWHERE??? In other words, will I be able to copy the resultant mp3 file to any other hard drive?? Any other limitation?
A. If you follow the tutorial above then yes... you will be able to use the MP3 anywhere that an MP3 is supported. MP3s created by CDMaster32 are not copy protected... you can use them just like any MP3 file. The Author of this tutorial uses this capability for several reasons:
- Allow fair use of his audio files. The author upgrades his computer several times of year - his WMA licenses are generally revoked due to Microsoft's DRM technology being tied to the current computer.
- Converting the WMA for use on his iPhone - since iTunes does not support copy protected wma files on iPods or iPhones. iTunes, iPods, and iPhones all understand MP3 files and can play them without issue.
- Use of the WMA on multiple computers; including his Car PC.
Q. Bad Quality. I know this is not related to your [tutorial], but I appreciate your input. Napster WMA files have a bitrate of only 128. I need 192. Would I be able to get that by burning via NApster to CD and then converting to mp3? Your website mentions 160 used by Napster... Are you sure?
A. No. Windows Media player cannot "improve" the quality of the WMA files when they are burned onto AudioCD. The DFX enhancement plug-in which can be added to CDMaster32 may provide you with some audio improvement on these files.
Q. Can I get music legally (online) from any other source (with a good selection) at a higher quality than 128 - preferably 192?
A. BuyMusic.com
is my preferred place for getting WMAs... mainly because I don't have to use Napster's clunky interface. However, they also seem to encode at 128kbits/sec.
Keep in mind that a WMA encoded at 128kbits/sec appear to convert to about a 160kbit/sec mp3 file. Which isn't that far "away" from 192kbit/sec.
If you use DFX plug-in
with CDMaster32... it may be just enough to get the audio fidelity your looking
for.
Q. The problem occurs after step #20 [in Windows Media Player]. It starts the burning process after I hit "copy." each track selected indicates "an error occurred" and the CD does not burn. Any ideas what could be wrong?
A.
Possible solutions here, here, or here.
Sounds like you need to contact
the supplier of the WMA files (Napster?)
because your new audio files won't burn using windows media player. Another guess is there is something wrong with the Roxio CD Burning engine which is part of Windows Media player.
You might also try using one of the other
supported applications.
Q. Everything goes as advertised until I hit the OK button to start ripping the CD [at step 36]. An error message appears [in CDMaster32] saying: "Could not open CDROM drive (F), Error=687, Ripping aborted."
A. ASPI layers (or DirectCD) are the only known cause for this error. Every time someone reports this error; I direct them to install build 1021 of Adaptec's ASPI layer and this appears to fix these issues.
Q. Everything goes fine until step 20 where I hit the copy button in WMP9. WMP9 displays an unknown error message: Error C00D11CD. I am attempting to burn files I downloaded from MusicMatch.
A. The MusicMatch WMA files are incompatible with Windows Media
Player's burning engine.
We suggest you customize this tutorial for use with MusicMatch or Roxio
AudioCentral.
Q. I cannot seem to burn my Napster files. At step 12 above; CDMaster32 claims I do not have rights to burn the file to AudioCD. I pay Napster every month to download WMA files to my computer, I should have rights to burn.
A. See:
http://sms.napster.com/help/Napster/faq/client/lfm/What_is_a_Napster_download.htm
Napster
offers two types of downloadable WMA files. As part of you premium service; you may have downloaded WMA files under the
"...download an unlimited number of tracks without purchasing them. These tracks are identified in your library by the icon in the Type column. If you try to burn or transfer a Premium service download, you will [need to purchase the track]." -- source.
In order to burn to AudioCD; you must Purchase the track; which costs $0.99 per track.
You cannot burn the premium tracks as they are "play only"; you must purchase them as "Purchased Downloads" to burn to AudioCD or convert the WMA to MP3.